|
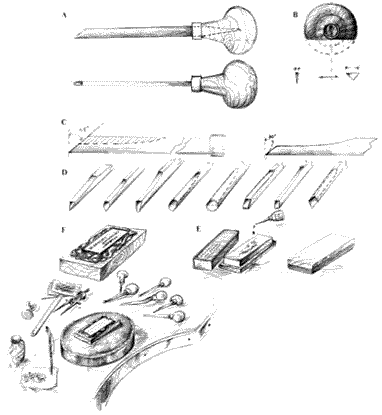
These decorations that seem dotted designs in black and white,are obtained by using tools called burins composed by a part in temperate metal with a length of 12 cm (dis. A) its point has a triangular section of 3 mm and has the form of a "V" more or less open according to the type of cut wanted (dis. B). The opposite end bit is fixed to a wooden handle with the form of half a sphere or a pear so it can be held. It will have to be held with the palm of the hand while the thumb and the forefinger will hold the metal part. The top of the burin is made thin (sharpened) to degrade in two precise points (dis. C) so that the extremity, which will have an angle shot of 30 degrees, won't be too weakened: this is done to allow the unloading of the metal curl (burr) that will formed on the end of the tool. The section of the tool changes according to the cut that is wanted (dis. D). On an "Arkansas" stone wet with some oil, sharpen the end of the burin keeping it vertically, in an askance way in comparison to the length of the stone and at this point go along it with clear lines 4 or 5 times; check the regularity of the triangle formed on the end, and in the end levigate on shiny paper, special for burins, the sides of the burin in direction of the point, so that the flash of the metal formed laterally can be taken away. Slightly incline the the burin vertically over the stone on
|
|
 |
|
|
|
the unloading part and go along the stone 2 or 3 times. This time a smaller triangle will be formed that will allow to have very light lines. Pass again laterally with the shiny paper to take the burr away from the sharpening. The more the sides are smooth, the more they will slide down the metal and shine even more. A good thing to do is to repeat this operation many times during the work. Once this operation is done, grasp the iron (tool) in the palm of the hand and push its point in the metal that has to be engraved for 4-5 mm according to the design, keeping it nearly parallel to the plan; if the inclination is increased, the incision will be more profound. Every push is equivalent to a small curl of metal raised up and so a movement of the wrist upwards will help to detach it. It is very important not to leave any remainders because they would stick everywhere leaving the incision dotted and unpleasant. Some remainders can be squashed with the burnisher, a steel pencil that has a conical point and an olive curved one that will serve to correct eventual mistakes making it go up and down, crossing the passages on the line to correct. If the reflections disturb the work the object can be darkened with talc. For a good and precise execution, prepare for first thing the design and transfer it if it is possible on the surface strewn with varnish "Damar" that will detain the pencil of the shiny paper used for the transfer of the negative side of the design. Once the varnish has dried, the design will remain to the engraver's disposal without having to turn the surface round. When the work is finished the varnish is taken away with some solvent. The movement of the wrist that engraves and the rotation of the plate will help to curve. The object that needs to be engraved is usually put on a base made out of wood and kept still with some pitch. This base is put on a cushion of leather slightly round (dis. F) to facilate its movements.
|
|